
Microsoft SQL Server Error 233 Login Failed Solution Step by Step

While accessing the DB sometimes user faces the situation when they log into SQL Server Authentication mode, and it displays the error message as shown below. Moreover, users also face several errors like Microsoft SQL server error 233, error 26, error 40, error 3271, etc.
Today, we will discuss the SQL Server Login Failed Error 233: No process on the other end of the pipe which often arises due to restrictions in establishing a connection. For users, understanding, this article consists of the user query with general fixes, detailed manual solutions, and an advanced automated method as well. Moreover, most questions by users are also there in the end.
SQL Server Login Failed Error 233 – User Query with Common Fixes
To understand the error in a better way, we have mentioned two of the actual user queries below. This will help users understand similar errors in the exact same way. Moreover, along with the queries, the most common hit and try fixes are also mentioned below.
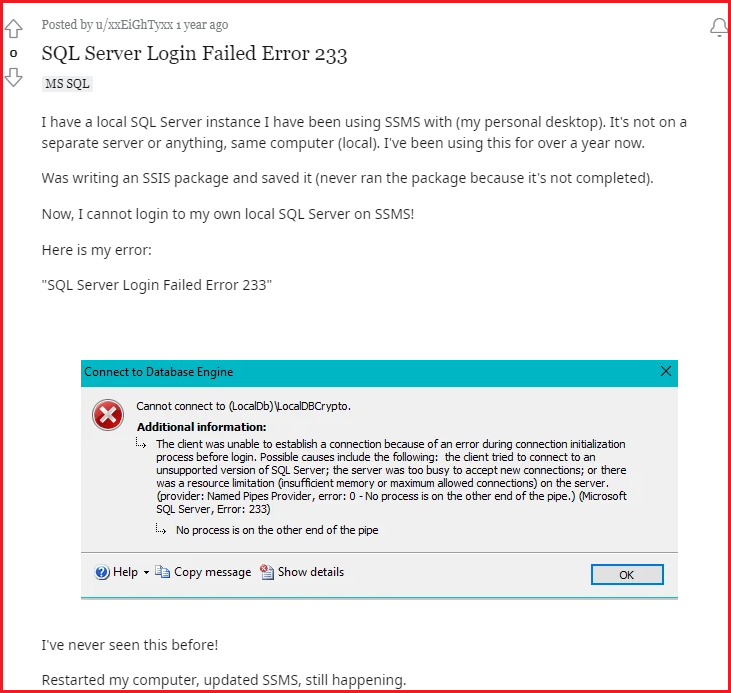
User Query 1
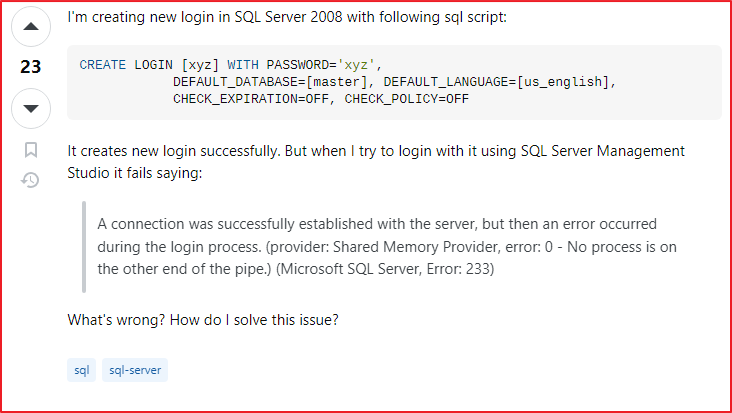
User Query 2
Most Common Ways to Fix Microsoft SQL Server, Error: 233 by Users
1. Authentication Mode
– It is possible that users might have chosen SQL Server Authentication but forgot to enable it. Users can fix it through SSMS under SQL Server and Windows Authentication mode.
- Log In to MS SQL Server Using Windows Authentication
- Right-click on Server Name under Object Explorer & Hit Properties
- Click on the Security Option in the New Tab
- Select SQL & Windows authentication to proceed
- Hit the OK button.
- Now, simply Close the SSMS
- Now, Start and then Run
- Here, Users Need to Write Services.msc
- Search SQL and Restart Entire Services
2. Check Error Logs
– Users must check for the SQL Server error logs for in-depth error messages. Location for the same is:
%USERPROFILE%\AppData\Local\Microsoft\Microsoft SQL Server Local DB\Instances\mssqllocaldb\error.log
3. Run as Admin
– Admin access can solve such issues sometimes.
- Right-Click Microsoft SMSS
- Run as administrator
4. Change Server Name
– Users should try to change the Server name. Local host or .\ can be opted.
These were the soft solutions or we can say common fixes that users most often try. However, let’s have a look at the best fixes.
SQL Server error 233 – All Authentic Solutions
Now, that users have gone through the basic solutions, let’s understand this in depth. We can overcome the issue faced by users while authenticating the SQL Server. There are some possible ways, which help the user resolve SQL error 233 by checking and enabling the following settings in SQL Configuration Manager. Both manual as well as automated solutions are discussed in the article as follows.
| Solutions | Troubleshooting Process |
|---|---|
| 1. Using TCP/IP Method | Launch MS SQL Server, navigate to configuration tools, Fix by Opening… See Full |
| 2. Using Shared Memory | Shared Memory protocol is quite useful for connecting with SQL Server … See Full |
| 3. Fix Named Pipes Protocol | To enable the named pipe protocol, Go to network configuration in SQL … See Full |
| 4. Checking Remote Connection | Connect with SQL instance using the SSMS, Right-Click on instance & … See Full |
| 5. Repair Damaged Files | Launch the SQL recovery solution, add MDF files from the system, and … See Full |
| 6. Virtual Adapter Method | VIA known as the Virtual Interface Adapter may also be the cause here … See Full |
| 7. Firewall View Port Fix | Now, view the port in Windows firewall through the Control Panel using … See Full |
1. TCP/IP
There are two or more SQL Servers, which are associated across a network. Then, all the communication is done by using TCP/IP protocol. There is a default port for SQL Server Installation, i.e. 1433. This port can be changed if required through SQL Server Configuration Manager. For SQL Server to be connected properly, TCP/IP should be enabled. Follow the steps given below to solve Microsoft SQL server error 233 safely.
- Open MS SQL Server in your system
- Go to configuration tools, and then open SQL Server Configuration Manager in your system >> SQL Server Network Configuration.
- Choose the TCP/IP option and enable it with a right-click
After completing the procedure, restart the SQL Server for the changes to take place.
2. Shared Memory Protocol
The Shared Memory Protocol is used for connecting SQL Server, which is running on the same system. It is not useful for most of the database activity. Sometimes, the user faces an authentication error, when Shared Memory protocol is disabled. It can be easily enabled with the few possible steps as discussed:
- Go to Start → All Programs → MS SQL Server → Configuration Tools → SQL Server Configuration Manager.
- Choose SQL Server Network Configuration.
- Then, right-click on the option Shared Memory → Choose Enable.
3. Enable Named Pipes Protocol to Fix Pipe Error 233
Named Pipes protocols are established for local area networks. In it, a part of memory is used by one procedure to pass the info to other processes. Another way can be on the same system or on a networked system. The user faces this SQL server error 233 because the Named Pipes are disabled, so to enable it user can follow the same procedure as mentioned above by opening the SQL Server Configuration Manager → SQL Server Network Configuration → Named Pipes Protocol →Enable.
4. Check for Remote Connection
To enable the remote connection is also important. If this feature is turned off, then SQL Server will work properly on your system but if your feature is on then, follow the steps given below & get rid of SQL error 233 smartly:
- Click on Server node → choose Properties.
- At the left Tab select connection → check the option “allow remote connections to this server”
5. Professional Method to Troubleshoot the SQL Error Code 233
Troubleshooting SQL Server Error 233 requires a systematic and professional approach which can best addressed through the use of SQL database MDF repair tool. This error is often referred to as “No process is on the other end of the pipe.” This can be a significant reason to disrupt database operations and hinder application functionality.
Step-1. Launch this Automated Tool on the computer.

Step-2. Now, Add the MDF File in the system to repair.

Step-3. Select Quick or Advanced Scan Mode here.

Step-4. Set the Destination Location & the objects.

Step-5. Click Export button to fix MS SQL error 233.

6. Virtual Interface Adapter
VIA is a Virtual Interface Adapter, that works with VIA hardware. Even, the user faces an error when VIA is not enabled in your system. So, to remove the Microsoft SQL server error 233 issues, enable the VIA option from the SQL Server Network configuration.
7. View the Port in the Windows Firewall
Windows Firewall acts like a wall in between the server and your system, to protect from all malicious attacks. However, various ports and services are refrained by default from the firewall. Even SQL Server ports are not viewed in the firewall.
SQL Server ports running on the system, are added to the exception, and then the firewall filters all traffic from those ports. SQL Server runs on 1433 port by default but if the default port is changed, then the new port is added to the exception. It can be done following the steps:
- First, open the Control Panel in your system.
- Now select Windows Firewall → Change Settings.
- Click on Exceptions, and then select Add Port.
- A window will appear, now fill in the port number, and click on the OK button.
- Then, enable the SQL.
Why the Automated Tool to Fix SQL Server Login Failed Error 233
There are several useful attributes of instilling this utility in the workflow. Users can easily get the best in class solutions without any hassles at all. Also, the repair process is very easy to solve SQL error 233 problem.
- Table & Object Recovery: Easily recover tables, triggers, views, and more.
- Deleted Records: Retrieve deleted records effortlessly.
- Data Export Options: Export to SQL Server or scripts.
- CSV Export: Quick export to CSV files.
- Compatibility: Works with various SQL versions.
- Network Support: Export to networked SQL Servers.
- Selective Export: Choose schema, data, or both.
- Ransomware Recovery: Recover data from ransomware-affected MDF files.
The Final Say
In the above discussion, there are some relevant solutions discussed to remove the SQL Server Authentication Error 233. If the user still faces an error, then they can utilize an alternate method, i.e. use sqlbrowser.exe. It is another way to prevent the occurrence of this error by simply search sqlbrowser.exe on the drive where SQL Server is installed. Then, copy the path of sqlbrowser.exe and create an exception of that file on the Firewall. It helps to resolve the SQL login failed error 233.
However, if you are still facing the error, you can use the alternative solution, i.e. SQL database MDF repair tool. By using this technique you can get a seamless database experience.
Also Read: SQL Server Does Not Exist or Access Denied – Best Solution
Frequently Asked Questions
Q-1. What is error 233 in SQL Server?
Ans. SQL Server error 233 occurs when the client is unable to connect to their SQL Server. It occurs due to several reasons but mainly when remote connections aren’t allowed.
Q-2. How to enable TCP/IP in SQL Server?
Ans. Follow the simple steps to enable TCP/IP:
- Open the SQL Configuration Manager.
- Select SQL Server Network Configuration
- Select Protocol option
- Enable TCP IP protocol.
Q-3. How to configure SQL Server to accept remote connections?
Ans. Open SQL Server Management Studio & follow these steps:
- Open Object Explorer.
- Right-click Server & Select Properties.
- Choose the Connections Mode.
- Go to Remote server connections.
- Select Allow Remote Connections.
Q-4. How do I open port 1433 in SQL Server?
Ans. Evidenty, Connect SQL Server & Open Windows Firewall. Click Inbound Rules & Select the New Rules option. Select Port Type & Rules & then Specify 1433 and 1434 ports. It’s as easy as solving the SQL Server error 233.